SWSVIC's Heat & Odor Reduction System

DISCLAIMER: PERFORM THIS MODIFICATION AT YOUR OWN RISK, THIS POST IS FOR INFORMATIONAL PURPOSES ONLY. THIS HAS NOT BEEN REVIEWED AND/OR APPROVED BY GROBO (The manufacturing company) AND I IN NO WAY AM RECOMMENDING THAT ANYONE PERFORM THE MODIFICATION UNLESS YOU ARE PERSONALLY WILLING TO ACCEPT ALL CONSEQUENCES INCLUDING BUT NOT LIMITED TO PERSONAL INJURY, AND/OR PARTIALLY OR COMPLETELY DESTROYING YOUR GROBO.

Hello AG,

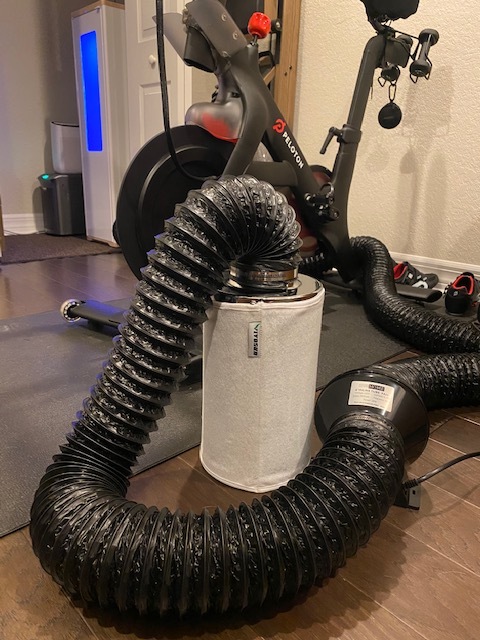
Below are instructions, images, and product links for a very simple heat exhausting/odor killing system. (Full disclosure I have only been able to test the odor block with scented spray, it worked perfectly blocking 100% of the perfume scent so I’m expecting it to do the same when its “game time”). I am sure that there are better/higher quality products out there, and I am sure I will find them and buy them down the road. This setup was very inexpensive in my opinion ($105.92 USD), It was more of “concept build” however I was shocked by the performance (closet temperature dropped from 79 to 74 degrees F due to this mod alone) and thus… I’m gonna run it till the wheels fall off.

Note: This mod requires you to have the ability to run 4" ducting out of your room/closet to another area or at the very least run ducting 10 feet or so away from the Grobo if your room is large enough (I ran my from my Grobo closet out into the office that the closet is in, not far, completely effective). That said the system is very portable and can very easily/quickly be compacted without disconnecting a thing and stowed away next to your Grobo should you have visitors with whom you prefer to exercise discretion.

Tools: Phillips head screw driver, wire cutters, box cutter/razor blade.

Supplies:

https://www.amazon.com/AC-Infinity-Heavy-Duty-Four-Layer-Ventilation/dp/B071LHCFZ8/ref=sr_1_1?crid=UIK2XM3TVGJJ&dchild=1&keywords=ac+infinity+4+inch+ducting&qid=1590183514&sprefix=ac+infinity+4+%2Caps%2C182&sr=8-1

https://www.amazon.com/VIVOSUN-Australia-Charcoal-Pre-filter-Reversible/dp/B01DXYMBU6/ref=sr_1_1_sspa?crid=27YS2776CWZIN&dchild=1&keywords=vivosun+4+inch+carbon+filter&qid=1590183578&sprefix=vivosun+4%2Caps%2C179&sr=8-1-spons&psc=1&spLa=ZW5jcnlwdGVkUXVhbGlmaWVyPUEyWEtZWkhZQldVWlBIJmVuY3J5cHRlZElkPUEwMTA0ODQxMkY3WkxWNVFFVUw1MiZlbmNyeXB0ZWRBZElkPUEwNDYwODk5VE9UVktXOFpPWVBRJndpZGdldE5hbWU9c3BfYXRmJmFjdGlvbj1jbGlja1JlZGlyZWN0JmRvTm90TG9nQ2xpY2s9dHJ1ZQ==

https://www.amazon.com/VIVOHOME-Plastic-Exhaust-Hydroponics-Ventilation/dp/B078HFVTYX/ref=sr_1_2?crid=3LBC5AQVE3CA8&dchild=1&keywords=vivohome+4+inch+inline+fan&qid=1590183786&sprefix=vivohome+%2Caps%2C182&sr=8-2

https://www.amazon.com/AC-Infinity-Stainless-Ducting-Ventilation/dp/B07L4S62Q6/ref=sr_1_2?crid=2ZLV9HOWAVCQ1&dchild=1&keywords=ac+infinity+stainless+steel+duct+clamps&qid=1590183842&sprefix=ac+infinity+stain%2Caps%2C164&sr=8-2

https://www.amazon.com/Collection-Joiner-Flange-Peachtree-Woodworking/dp/B0013EI05Y/ref=sr_1_3?dchild=1&keywords=dust+collection+6+inch+x+10"&qid=1590183979&sr=8-3

https://www.amazon.com/gp/product/B005HYDC68/ref=ppx_yo_dt_b_asin_title_o03_s00?ie=UTF8&psc=1

Instructions:

  1. Position Grobo so that you have at least 7 inches from the rear of the Grobo to the wall behind it.

  2. Measure, cut, peel, and stick magnet strips around the outer edges of the 6" x 10" dust collection joiner flange. Once done with extremities put an extra (double layer) 9" magnet strip in the middle of the top edge stacking on top of the strip that is already there.

  1. Attach one end of 4" ducting to the outlet on the dust collection joiner flange using a stainless steel duct clamp.

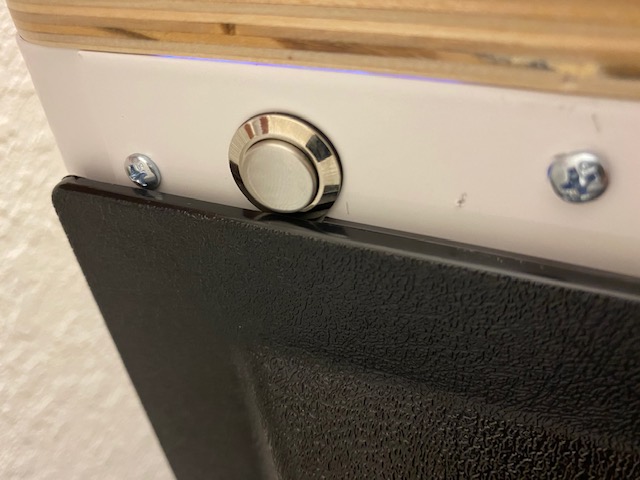
  2. Attach magnet side of dust collection joiner flange to rear of Grobo over the vent at the very top of the Grobo with the double layer magnet on top. This will require some adjusting, the goal is to block out the light being emitted from the vent. You will need to mount it directly under the Grobo control button as pictured below.

IMG_9904

  1. Run 4" duct out of or to the other side of the room/closet where your Grobo is placed to the location where you will place your inline fan. Once placed pull the 4" duct toward the fan until it is semi-tight from the Grobo and bunched up toward the fan. Once you’ve done so, account for the bunched amount and cut your duct using a razor blade to cut the aluminum ducting and wire cutters to snip the wire therein. Once cut slide it onto the intake end of you’re inline fan and secure it with a stainless steel duct clamp.

  2. Using another 4" duct clamp affix the remaining 4" duct to the outflow end of your inline fan.

  3. Using your final duct clamp secure the open end of your 4" duct to the opening of the carbon filter.

  1. Next, position your carbon filter where you would like it to remain during your grow.

  2. Go back to where the dust collection joiner flange is attached to your Grobo and ensure that it did not shift during your system assembly.

Note: Durring germination and veg stages (until the point your plant starts smelling DANK) feel free to go without the carbon filter.

This concludes your exhaust system assembly! Enjoy the cooler temperature of your grow room! Please, if anyone can think ways to optimize this system be it through design or better quality products, feel free to comment with your ideas/advice. Constructive criticism is always welcome!

17 Likes

Tested system by disconnecting the magnetized dust collection joiner flange from the rear of the Grobo and unplugging the in-line fan for 30 minutes and then plugged it back in and re installed the joiner flange. Below is a screen shot of what transpired during that time via my Govee WiFi thermometer/hygrometer:

4 Likes

Looks very cool! Thanks for sharing!

2 Likes

Good shit fr… You seem like a novice at this now so asking how long have you been doing this and how many strains have you completed flawlessly? Gotta wait another month before I can even drop that 1st seed.

2 Likes

Complete novice, 0 strains completed whatsoever :joy:. Just having fun optimizing the hell out of this box.

7 Likes

So have you ever used an other device besides the Grobo? Because I see you putting a lot into your machine.

1 Like

Nah, just tend to go in on things pretty hard.

4 Likes

Not quite sure how this is possible but now that my lower Grobo fan is running, when coupled with the heat venting system it stays 1 degree cooler inside the box than in the closet where it lives :man_shrugging:t2::joy:. I pulled and calibrated/synched the thermometers just to confirm. Feels good to be a gangster.

8 Likes

Great mod! I was looking into something like that but couldn’t figure out what to attach to the back of the unit. Pardon for noticing something: it appears you are pushing the exhaust into the filter? In that case then you have the pre-filter (the white fabric material wrapped outside the filter) set up incorrectly. The pre-filter needs to go inside the canister. But I still love the contraption!

2 Likes

Hey @MindFlayer thanks for the heads up, that makes perfect sense! I am not currently running the filter as it is unnecessary this early in my grow but I will surely do so when the time comes!

1 Like

Hi fellow grower,
Question does this help lower humidity by chance?

Hey @AandM-farms, it did take my RH down a couple points. Nothing dramatic but yes it did lower humidity by creating “negative pressure” along with the fans I am running inside the box. What is your current RH?

1 Like

Thank you for the information right now I’m fluctuating between 50-57. Begin stages of flower. I do have a extra fan inside grobo. Might need to invest in dehumidifier. Appreciate your time thanks again

Definitely do dehumidifier, just be careful as bigger units will increase temperature. Have you seen these? They are small enough to fit inside the unit.

New and Improved Eva-dry E-500 Renewable Mini Dehumidifier

https://www.amazon.com/dp/B00BD0FN8A/ref=cm_sw_r_cp_api_i_arn7Eb8SVG1Y4

2 Likes

I have one and it just not pulling enough out. I have had it for a month it might drop humidity 1-2 rh. I live in So. cal long beach and temps been high. AC in room running when temps get over 74. Thank you for the info.

1 Like

Good to know, I have one as well that I was planning on running during flower.

1 Like

Also when you plug it in to recharge it gets really hot. Just be cautious.

Very good to know! Does it heat up during use as well?

1 Like

No not that I am aware of. Just when plugged in to recharge after all the silica beads inside are wet. That’s how it dries it out. Plug in to dry it out.

1 Like

Copy that, thanks for the heads up, will plug it in away from the box

1 Like