SWSVIC’s First Grow (Ever...) ILGM GDP

Hello AG,

First let me start by saying THANK YOU to all members on this forum. It truly is a remarkable group of intelligent and friendly growers. I’ve have been so impressed by all that I have learned prior to this first grow and even more so by the willingness and enjoyment of lending well thought out expert advice. I very much look forward to offering any information and assistance that I can and building new friendships with awesome growers alike.

My Grobo lives in a small walk in closet, about 3.5’ x 5’ needless to say it gets a bit warm in there (temperatures ranged from 80-83 degrees Fahrenheit prior to intervention) … thus prior to my grow and after reading close to if not every thread in this forum (and forming a mild obsession) I took it upon myself to make some modifications to the Grobo and it’s closet home. I added a water chiller with external pump and through reservoir wall tubing to cool and circulate the water, added a liquid cooled CPU fan to stir the stir the air inside, designed and implemented a heat venting system that is mounted to the vent at the very top of the rear of the Grobo, and added an oscillating tower fan to the closet to push lingering heat out. With all of this I was able completely mitigate the heat caused by the Grobo and water chiller and it now stays between 74-76 degrees inside the unit and 73-75 degrees in the closet. I am in the process of writing up details and photographing these mods and look forward to sharing them with you all in the very near future. I also purchased a litany of other items and nutrients to assist in my efforts based on the recommendations throughout the AG forum that I can’t wait to use (like I said “mildly” obsessed :joy:).

So without further ado, here she is, my little GDP baby!

Regards,

SWSVIC

25 Likes

Nice, looking forward to seeing the pics, especially the ones that show the piping through the reservoir :eyes:

3 Likes

I get the feeling that you go all into everything you decide to do, I’m the same way :slight_smile:. Definitely looking forward to seeing the modifications and journey of your grow. Enjoy!

3 Likes

Guilty af :joy:

2 Likes

Will get at least that portion up tonight :call_me_hand:

3 Likes

Hey, grower! Glad to learn you were able to bring the temperature in the closet down to proper growing conditions. What are your plans for the typical smell that will start becoming noticeable soon and get more pungent as the plant progresses? I have the unit in a closet also and had to put a carbon filter with an in-line fan to alleviate the issue. I’m a bit concerned with your idea of possibly adding other nutrients besides the ones specifically made for this machine. New formulas will throw the system off and cause your grow to suffer. Remember, less is more. Anyways, looks like you are willing to learn and ready to start growing. The unit is pretty much automatic and will prompt you for draining/filling, check water and dispense nutes, set the growth stages and regulate lighting as per the stage. But you still have to monitor closely your plant and take action when needed. This is a hands-on type of task even when using a machine. Welcome to our forum and keep posting your experiences and questions so you and others may learn. Happy harvest!

4 Likes

Yes I most certainly will. Below is an image of the additional nutes that I plan on utilizing. All are supplemental so should be fine with Grobo provided nutrients (only one way to find out) and at least testing on this run of the mill genetic won’t hurt as much as if it were the fancy stuff I have coming up next. That said I would GREATLY appreciate any input that anyone may have on these particular supplements.

For the smell I have attached a “dust collector” that would typically be used for a media blasting cabinet to the exhaust of the Grobo, I then attached that to a 4” duct which runs to an in-line fan and a carbon filter (this particular modification had the highest effect on lowering the temperature of the closet) I’m hoping that it has the full effects that are claimed by the manufacturer as my Grobo is near the front entrance of my home :grimacing:.

Thank you very much for the advice on “timing” my grow, I intend on asking a few days ahead of each stage transition in hopes of receiving expert advice on whether or not she is ready to graduate to the next phase.

As far as monitoring, I don’t think I could be doing so any more closely :joy: (See picture below). I’m glad to have the Grobo/AG team on my side, I certainly plan on remaining very hands on!

10 Likes

:+1:

2 Likes

Wanted to show you these as well, before you stick those screens on your unit!

Here’s a link:

Thermaltake 120mm Black Magnetic Fan Filter (AC-002-ON1NAN-A1) Amazon.com: Thermaltake 120mm Black Magnetic Fan Filter (AC-002-ON1NAN-A1): Computers & Accessories

6 Likes

Does that camera take pics? Does it do time lapse?

1 Like

It’s a Blink WiFi enabled security camera. It allows me to access real time video footage as well as take still images from on my iPhone from anywhere (so long as I have cell service). Helicopter parenting :stuck_out_tongue_winking_eye:. Chose this unit as it comes with a separate WiFi receiver that picks up the WiFi in your home, the camera then connects to the receiver. It allows for great signal strength as the receiver which I placed on top of the Grobo can receive the WiFi signal from outside the unit which then in turn relays to your camera.

The image quality is great but I wouldn’t use it for time lapse photos, go for something with higher resolution.

3 Likes

Is it the mini?

1 Like

I went with this one, mainly due to the fact that I had great success with them in the past for a different task:

Blink Indoor Home Security Camera System with Motion Detection, HD Video, 2-Year Battery Life and Cloud Storage Included - 1 Camera Kit Amazon.com: Blink Indoor Home Security Camera System with Motion Detection, HD Video, 2-Year Battery Life and Cloud Storage Included - 1 Camera Kit: Amazon Devices

4 Likes

Thanks! I think I’m going to get one for my next grow. Good luck on your current grow.

2 Likes

Great for peace of mind. I mainly use it to ensure lights are on schedule.

1 Like

They’re already on there, but it’s nice to know these exist :pray:t3:

1 Like

Got you, yours will def work. Just wanted to show you what I’m blowing money on.

2 Likes

I hear you, flex away :muscle::grin:

2 Likes

Day 6 (6 of 10 germination stage):

I topped off the reservoir today, it took very little water to do so, may 1-2 cups or so. Prior to my fill I measured EC @ 0.4, PPM500 @ 200, and pH @ 6.1, I would love to hear expert opinions on these readings on if my water nutrient solution is proper or out of whack. The solution is comprised of Grobo’s dosing of pH balancing & nutrients plus 2 mL per gallon Hydroguard and 2.5 mL per 3 gallons Recharge. (I initially mixed the Recharge and Hydroguard into my “fill bucket” and then filled the reservoir using the Grobo’s water pump).

I also had my first successful support ticket interaction with the Grobo team, I had installed the reservoir cover incorrectly (pushed it down to far, in between the wall that separates the nutrient bottles from the reservoir instead of setting it on top of the wall) which caused the bottom of my coco pod to sit in the water instead of suspend slightly above it. This was quickly recognized by their team and the easy fix was made immediately. (Thanks Danielle :blush:)

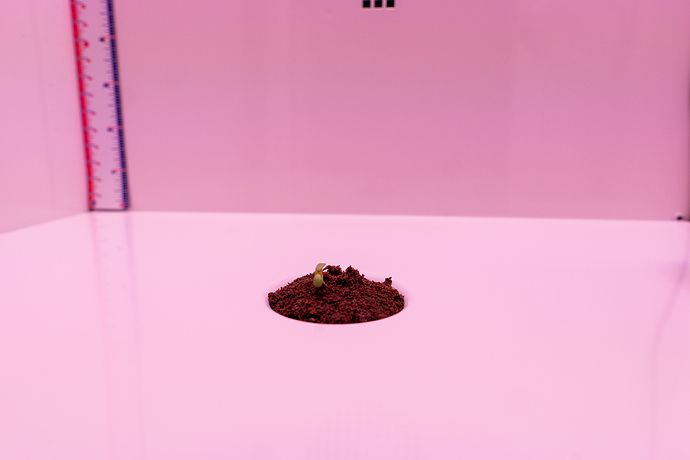
Otherwise, the only other thing that I have noticed is that she is “bowing” or bending forward (see picture below), is this natural? Is it a “bad”? Would love input on this as well!

6 Likes

Looks like she just needs a little support - there’s a few posts on here if you need ideas. You could probably even use a paper clip.

2 Likes