
Looking forward to it! Hoping they start to dense up!
2 Likes
I’m surprised oh how frosty. Worked on it today and it’s so sticky! You think I will need to add time?
1 Like
They have plenty of time left to fatten up!
1 Like
I’ve noticed my super crop didn’t leave a knuckleball. It’s bent over. Looks fine, but I am curious if I rubbed too much. @Bplatinum9 @Russel_Richardson any idea?
2 Likes
I think it will be fine… Looks like you did it right…
STEP ONE: Choose the branches you would like to super-crop.
Super-cropping is best done during the vegetative stage, once the plant has grown many healthy branches and is growing vigorously, but before it is full into the flowering stage.
- For super-cropping, you want to choose parts of the plant that are old, but still pliable (sometimes called ‘bendy’). The parts you use this technique on should still be green, and not wood-like the bottom of the main stalk.
- If your plant has multiple colas, you should super-crop the same location on multiple colas. When there’s only one main cola, you supercrop the pliable greener growth towards the top.
- Basically, you’re trying to create a flat canopy at the top, without any stems sticking up taller than the rest.
STEP TWO: Squeeze and bend branches
The idea is to damage the inner tissue of the plant without causing damage to the outside ‘skin.’ This makes the stem super pliable so it can easily be bent in the direction that you would like for it to grow.
- Grab the branch and squeeze with firm pressure between your thumb and forefinger, as if you’re trying to crush the stem where you want it to bend. This helps “loosen” the joint you are about to make.
- Wiggle the stem between your fingers slowly back and forth for 10+ seconds while maintaining pressure, to loosen it up where you want it to bend.
- Continue wiggling until it feels like the inside of the stem has softened. The stem should feel pliable and loose at the joint you just made.
- Slowly and gently bend over stem towards the direction you want, and secure in place.
This video demonstrates a grower squeezing the stem, then bending it over. This was a very young and flexible stem. For stiffer stems, you may need to wiggle back and forth for up to 60 seconds while squeezing/crushing the stem between your fingers, before it “loosens up” enough to bend without breaking the skin. Never force it! If it feels like it’s going to snap it probably will!
Some growers just grab each branch and snap them quickly, but doing this makes it more likely you’ll snap the outside tissue and need tape.
With that being said, cannabis plants are surprisingly resilient. If you don’t bend the super-crop site hard enough, it will just bounce back to where it was in a few hours. You still may need to secure the stem down to prevent it from growing back up!
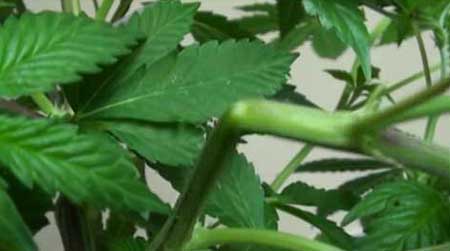
You know you’ve succeeded when the plant now appears somewhat ‘broken’ and now rests at a 90-degree angle where you bent it, and the branch stays down.

This illustration shows a perfect example of a super crop, one that doesn’t even need tape. Use tape if you go a little overboard.
In the best case scenario, the stem remains at a permanent 90° angle, while the outside tissue stays intact. At this point you need to secure the stem back down or it will come up again injust a day or two.
But no matter how you super crop, this process can cause your plant to grow a whole bunch of new colas and leaves. A plant doesn’t want to put all its effort into a branch that (as far as your plant is concerned) has probably just been attacked by animals!
STEP THREE: Fixing any tears in the outside stem & tying down
In the best case scenario, you don’t even need tape, because the outside of the plant is still whole.
- If you’ve gone a bit overboard, you may need to use duct tape (or another strong tape) to reinforce the plant so it can heal properly, especially if you can see an open slit or crack on the outside of the stem.
- If there was no cracking (yay!) then you only need to secure down your stem (or it will flip right back up in a day or two). Plant twisty ties or regular zip ties both work great!
- Regardless, the place that you originally bent will grow a big ‘knot’ almost like a permanent band-aid, which can transport more water, nutrients, and other good stuff compared to before.
STEP FOUR: Removing ‘bandage’ tape
- Wait about one week before removing any tape. It’s normal for the tissues to have discoloration at the healing sites.
- If the site is still grey and appears totally wounded, just put the tape back on until it has grown her protective ‘knuckle’.
Until then, the plant will be able to transport nutrients and maintain all normal processes as long as it has the tape as reinforcement.
If plant tries to straighten any branches, just tie them down (using Low-Stress Training techniques). Stems will easily give in to your will after being super cropped.
FINAL RESULT: More buds, more branches, and a shorter, more controlled and bushy plant. Perfect for closet, stealth grows.
2 Likes
It’s not showing any bad signs and I for sure didn’t snap it. I expected more of a knuckleball is all.
2 Likes
It takes more time imo. It will come mine just did and I super cropped a week or two before you I believe. And it will pick right back up lol. Well mine did at least. Next time if I have to I’m going to tie some fishing line with fishing weights on the ends to keep it horizontal until the knuckle forms. Idk for me the knuckle made the stalk reach back up, all my bends looked like yours lol
2 Likes
That’s good to hear! I kind of figured it would knuckleball and pop up sooner rather than later.
I told myself there isn’t any discoloration or look terrible, so I must be fine.
3 Likes
Yep, one of mine looked kinda crappy, like I bent it to much, but nope, she came back with a vengeance lol
2 Likes
The bigger ones always seem to have the bigger nugs. I was kind of hoping that since it’s bent. Get light on those underneath places for thickness.
I hope that branch bounces back and rewards you
2 Likes


2 Likes
More ganja action


Looks like it’s starting to knuckle up


It’s like getting a new puppy.

Smells like sweet earthy pine
7 Likes
Looking good my friend! What day is this??
3 Likes
22/47 waiting for the morning that they thick up
3 Likes


10 days left in flower. Really hope to see greater density.


Post before this one was 10 days ago for comparison
5 Likes
Yeah me too lol. I ran into some ph problems that I didn’t catch, which is my fault. But it hindered the growth for sure. I have 5 days left of flower then flush, I extended 2 weeks
Have you looked up close at the trichs? Did you end up extending at all?
1 Like
I have 10 days left to flower and I’ve not extended. I totally forgot to buy a scope, but ordered one this morning. That will be my next post. I’ll keep you posted.
1 Like
Struggling with using my microscope. Any advice.
From what I could see. Majority of tricome heads were clear. 5 days from flush.
Should I be looking to extend in flower or flush?
Take small clippings, I just use a sugar leaf close to a bud, 3 of them, from top, middle, and bottom. Then you can put it on the table and get focused better, that’s what I do. What exactly are you using? A jewelers loup or something else?
1 Like