
More like help shut them down.
5 Likes
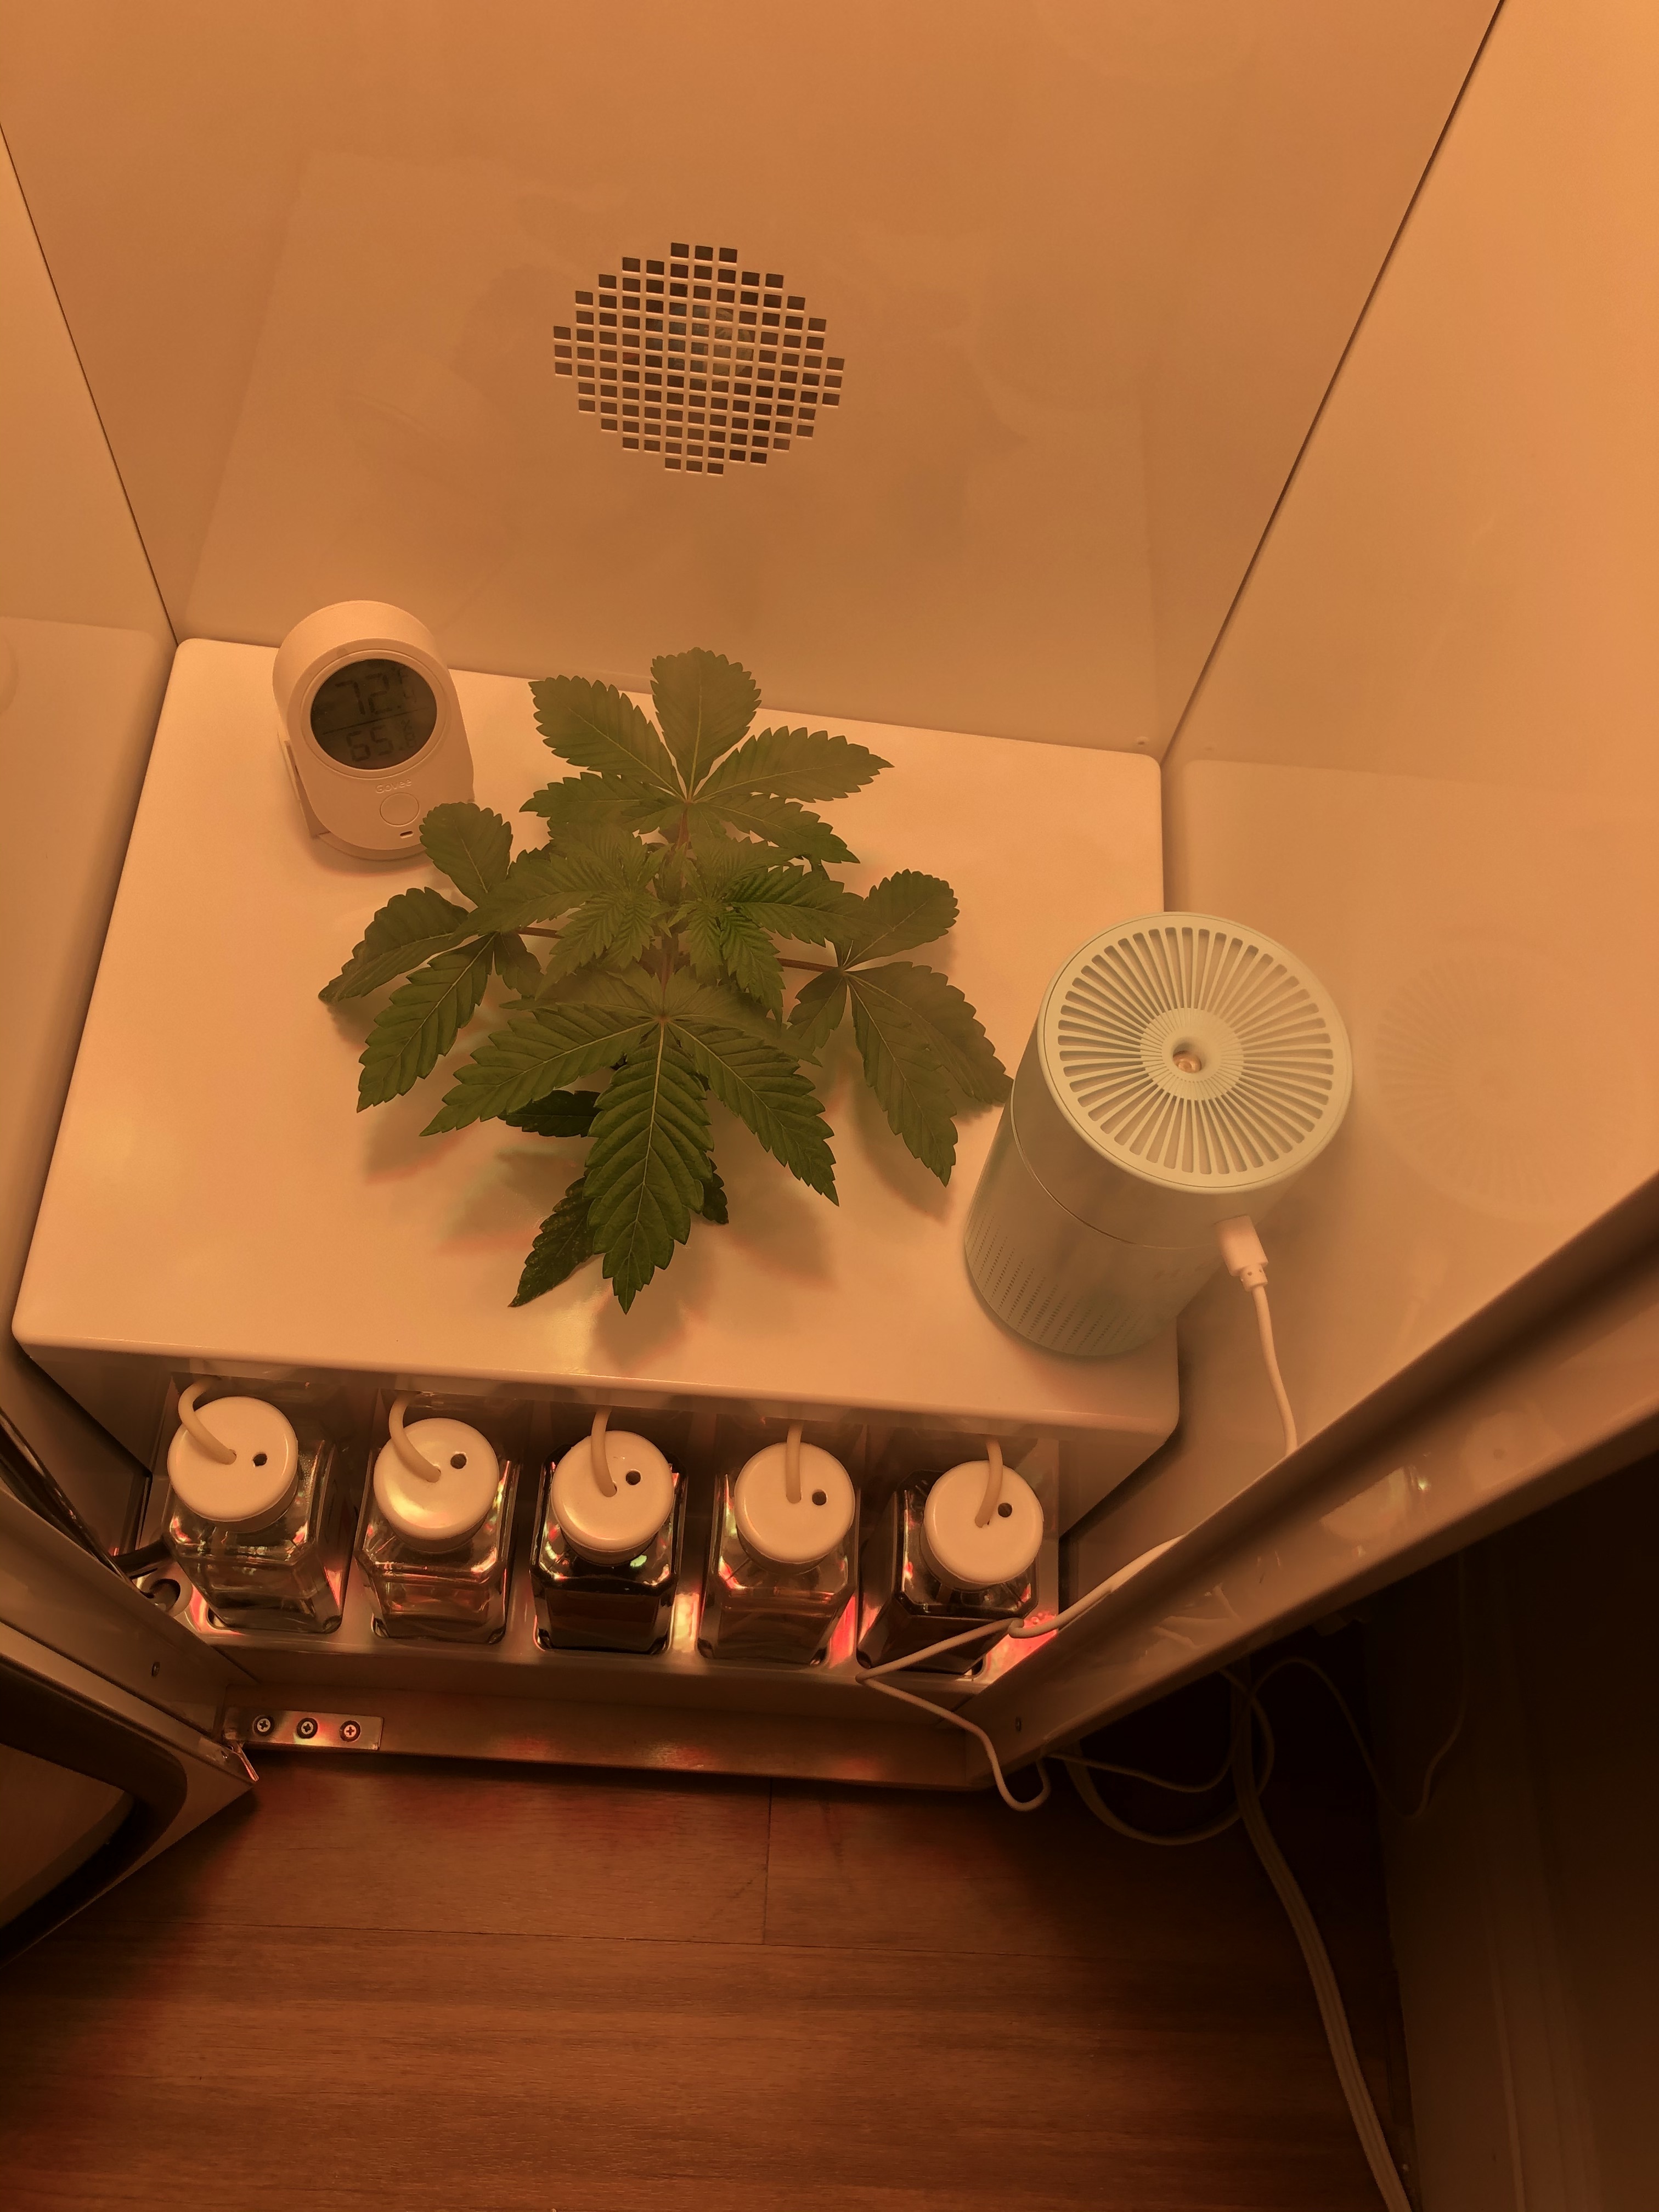
Early Vegetation Day 3:
Water temp: 80 F
TDS: 500 ppm
EC: .8
Average temp 82 F
Average humidity 46%
Updates: I noticed the other day that the tips of the leaves are starting to discolor. I know my water temperature and temperature have been high. I’ve order a water cooling that should be arriving in a week or two. Will this also help lower the temp in the unit by chilling the water? The hydroguard came in the mail. How often should I dose the water and how much? I did notice what looks to be some sort or residue building up (assuming because of high water temps). Should this be cause for concern? Typically my humidity has been around 58-60% however lately it has been lower. Thanks for the paper towel trick, it has been helping keep humidity up until the humidifier comes in. Also, I would not recommend that swamp cooler from before. It is inefficient and barely works. Does anyone have a recommendation on fans that I can get for my unit to run continuously?


4 Likes
The burn tips is pretty normal when going from seedling to veg since its the first time she is tasting the nutrients. Normally when we grow a seeding in a solo cup, the seedling is much bigger than the ones we grow in the grobo before we give it some nutrients. This is not a big deal since she will grow quickly and catch up with the dosage and you will eventually clip those burnt leaves in a few weeks. You can reduce the nute burns with dilution by adding a extra cup (or 2) of RO water directly into your reservoir.
The water chiller will not lower environment temperatures however it will make her much more tolerant to higher temps.
Silica and B vitamin are known to help plants be more resilient to higher temps, mold and bugs. However I would recommend getting your growing conditions in order and doing your research with Silica and vitamin b before diving into it, as you can harm your plant if you do not know what you are doing (most silica requires you to soak for at least 30 minutes to 1 hour and vitamin b will raise the ppm a bit).
Also when getting a TDS meter to measure your ppm, make sure you know which type of meter you have, ppm500 or ppm700 as their values are based on different ec mulitpliers.
Easiest way to lower environment conditions is to lower the temp in the room your grobo is in. If you have some basic electronic knowledge, you can make a DIY Air Conditioner by using a heat exchange that runs on much lower power than a regular AC unit.
https://www.allgrowers.com/t/mini-fans/5387
I would wait for her to get a bit bigger before giving her any direct wind and focus on keeping RH up for now. You can do daily water fills to help top of the reservoir and keep the nute ppm lower
3 Likes
Any more info on this topic?
I use a cool water fan from Amazon but it’s not doing the job that I’d like and the water tray is so small it runs out of water right away.
You can make a air cooler using a heat exchange with a radiator fan like in this example

Or you can make one using cool copper coils and wrap it around a fan super budget
")
With some duct addition you should be able to cool down your grobo.
I made one similar with the heat exchange before to chill my cousins garage where we do some jiu jitsu training and it kept us cool even during the cali summers.
You can also use a ice probe or make a diy water chiller with chill plates to chill the cool water for the ac. It takes much less energy and doesn’t affect the RH. If you are budgeting thses may be good options.
I have plans to make one to chill the room where my grow tent is going to be with a diy water chiller installed
2 Likes
@Vicc I’ve been looking for something like this on ebay for a year now. I’m not a handyman, nor do I enjoy building these things. If you figure something out would you be willing to work for commission and build some extra ones?
@omacoder I can DM you when or if I build mines. I am working on clearing up some new grow space for a grow tent. Most of the parts should total around $60 with out a power supply.
I can build one but shipping can be costly depending on the reservoir size. Most peole use a ice chest or just bucket of iced water.
I never really thought about making this for commission since this is all just hobby stuff for me
I just did a few research and wow! I didn’t think this was a business thing lol
4 Likes
@Vicc thanks. Love the frankencooler, exactly what I need but looks like it is out of stock.
I already have a water chiller that I could use to circulate water in and out of the cooler.
1 Like
That is probably be the easiest sustainable way instead of managing all the ice in the reservoir which can get old. The rest is just getting a pump tubes heat exchanger, radiator fan and power supply. I found a old 850 W computer power supply tucked away while cleaning up, I was thinking of using this to power if it still works.
1 Like
Instead of an ice bucket you could try a Peltier plate. They used to be used by people overclocking their computer CPU’s until water cooling became more mainstream.
https://www.marlow.com/how-do-thermoelectric-coolers-tecs-work
3 Likes
That is the plan. I will be using pelitier plates and powering / cooling them with parts from my old computer which I have plenty of since I do work in the video game industry and built all of my own computers. You can use a led power supply driver from an old led light as well.
Depending on the comfort level, some may want to go the simplistic route and use ice 
4 Likes
Early Vegetation Day 14/14:
PH: 5.8
Water temp: 19-20 C
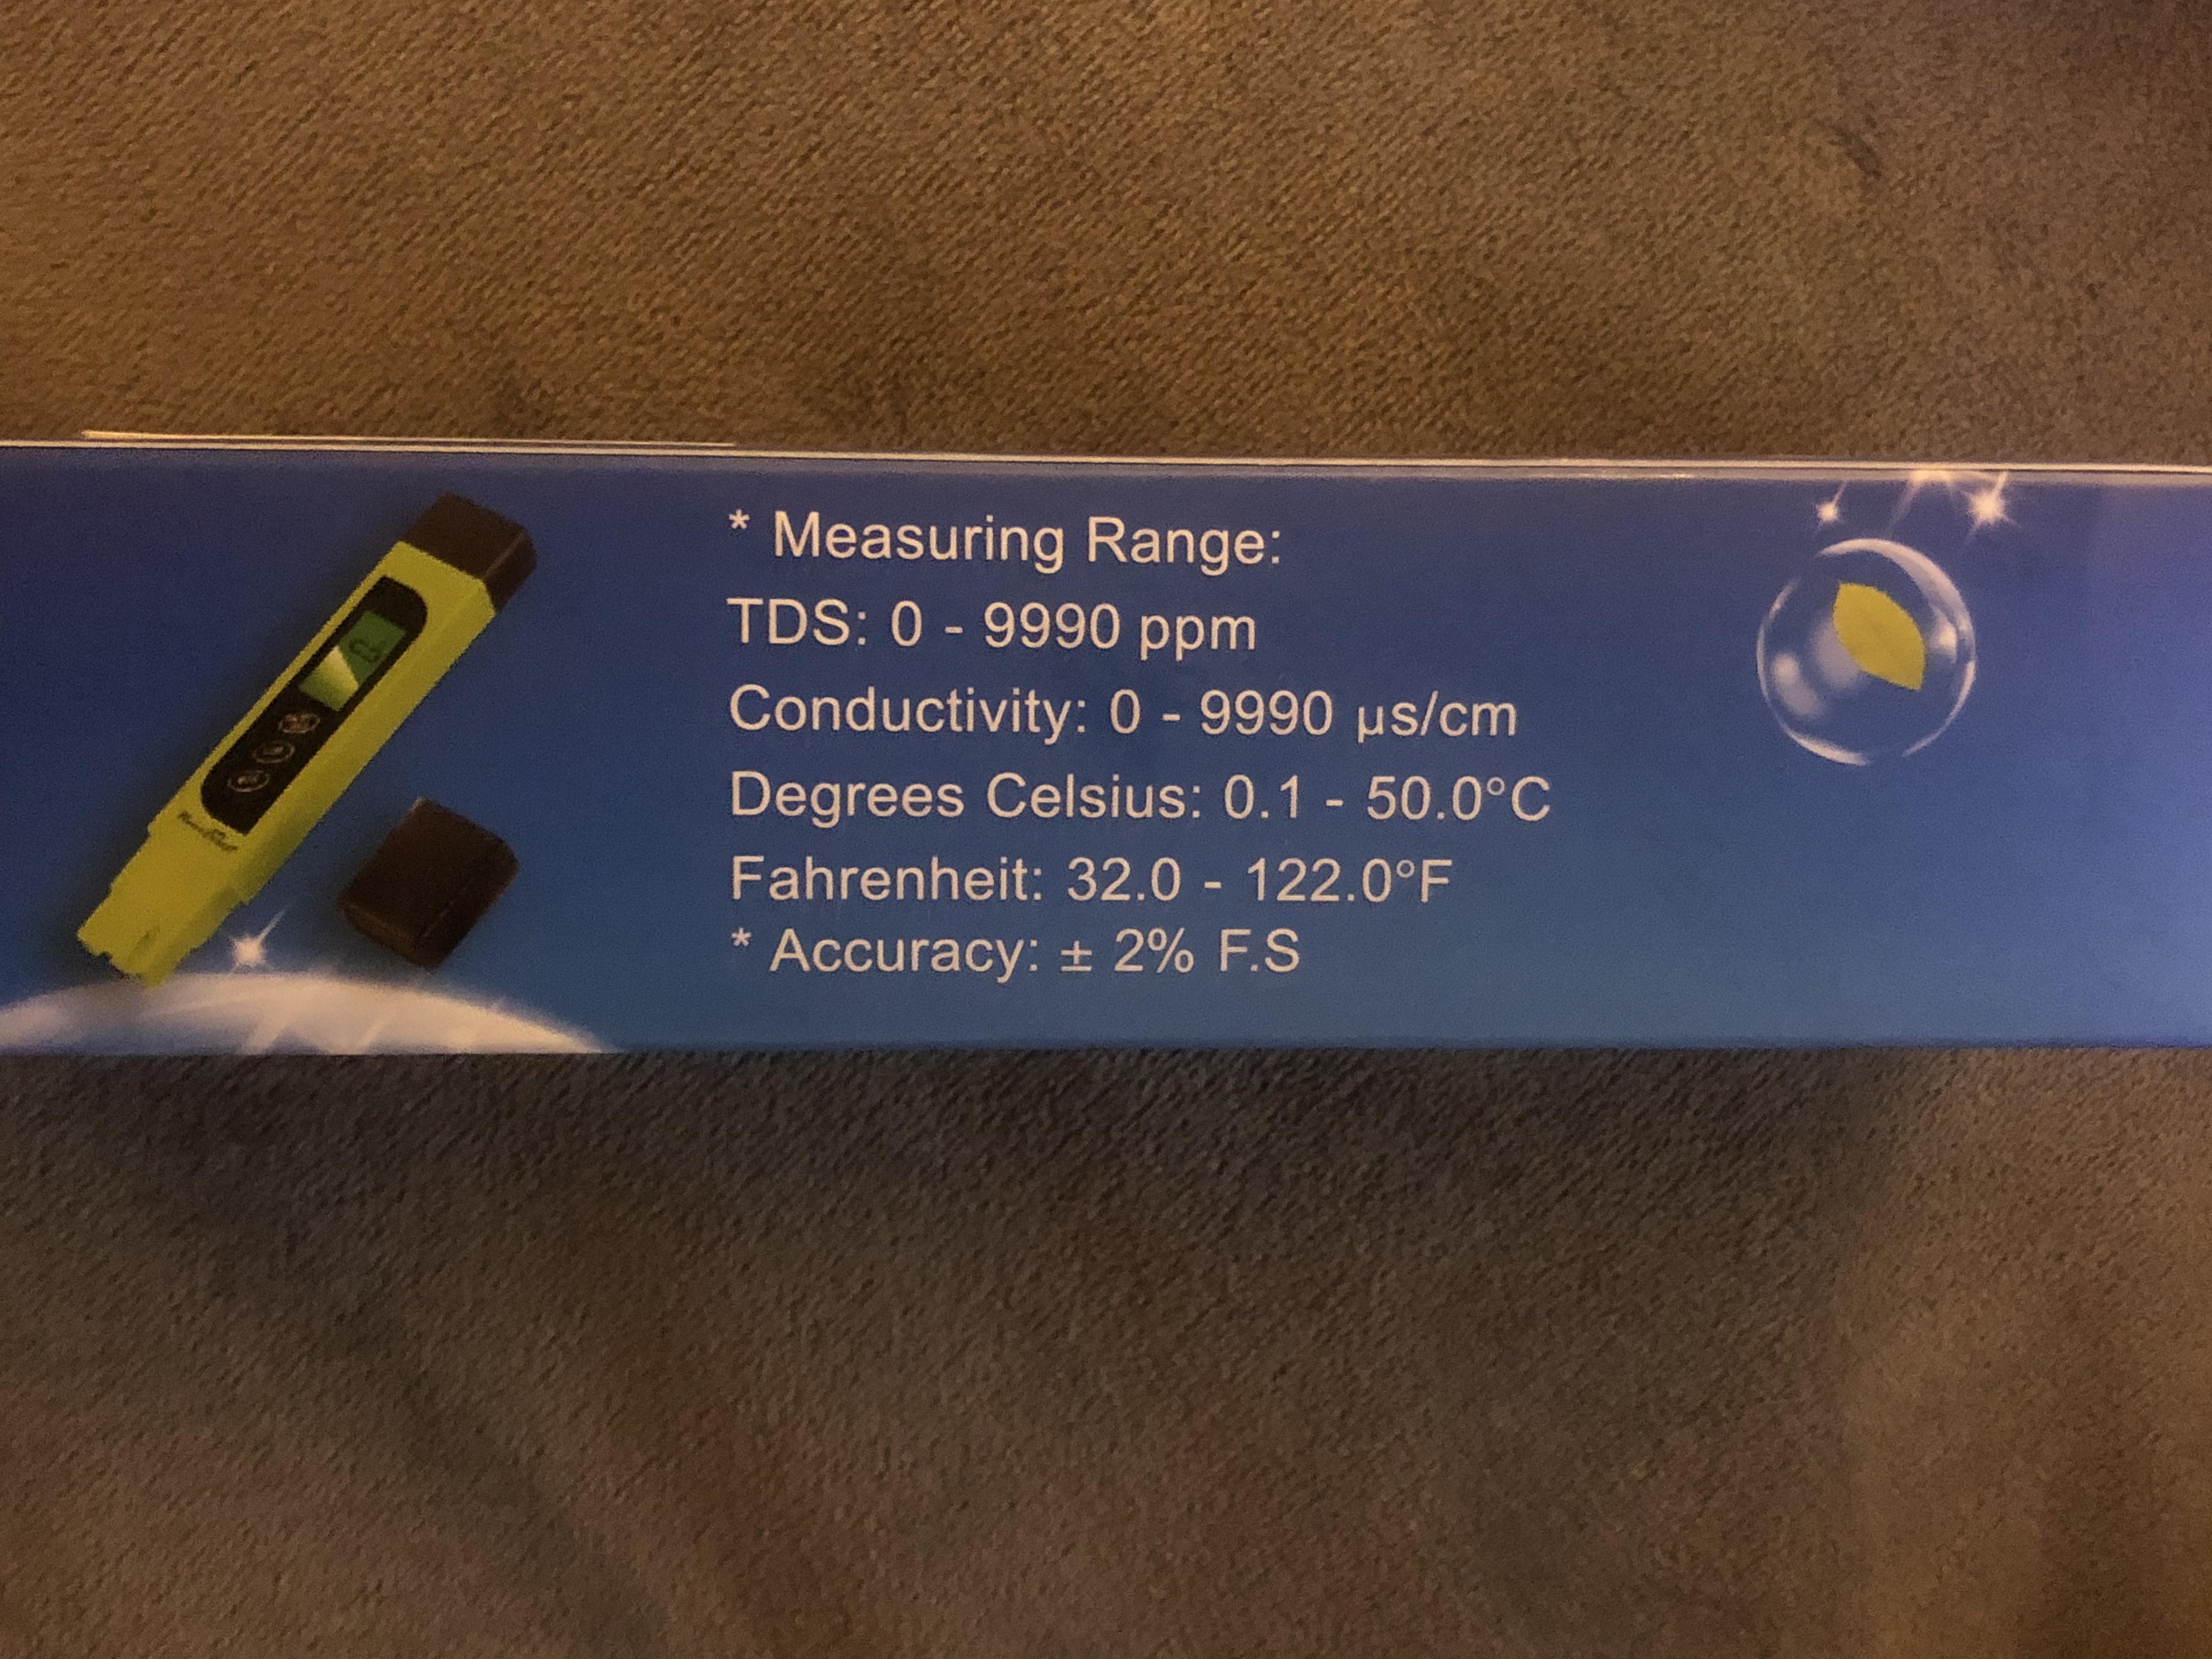
TDS: I am unsure how to tell which meter I have @Vicc please help. I posted a picture of the box below.
Average temp: 74 F
Average Humidity: 60%
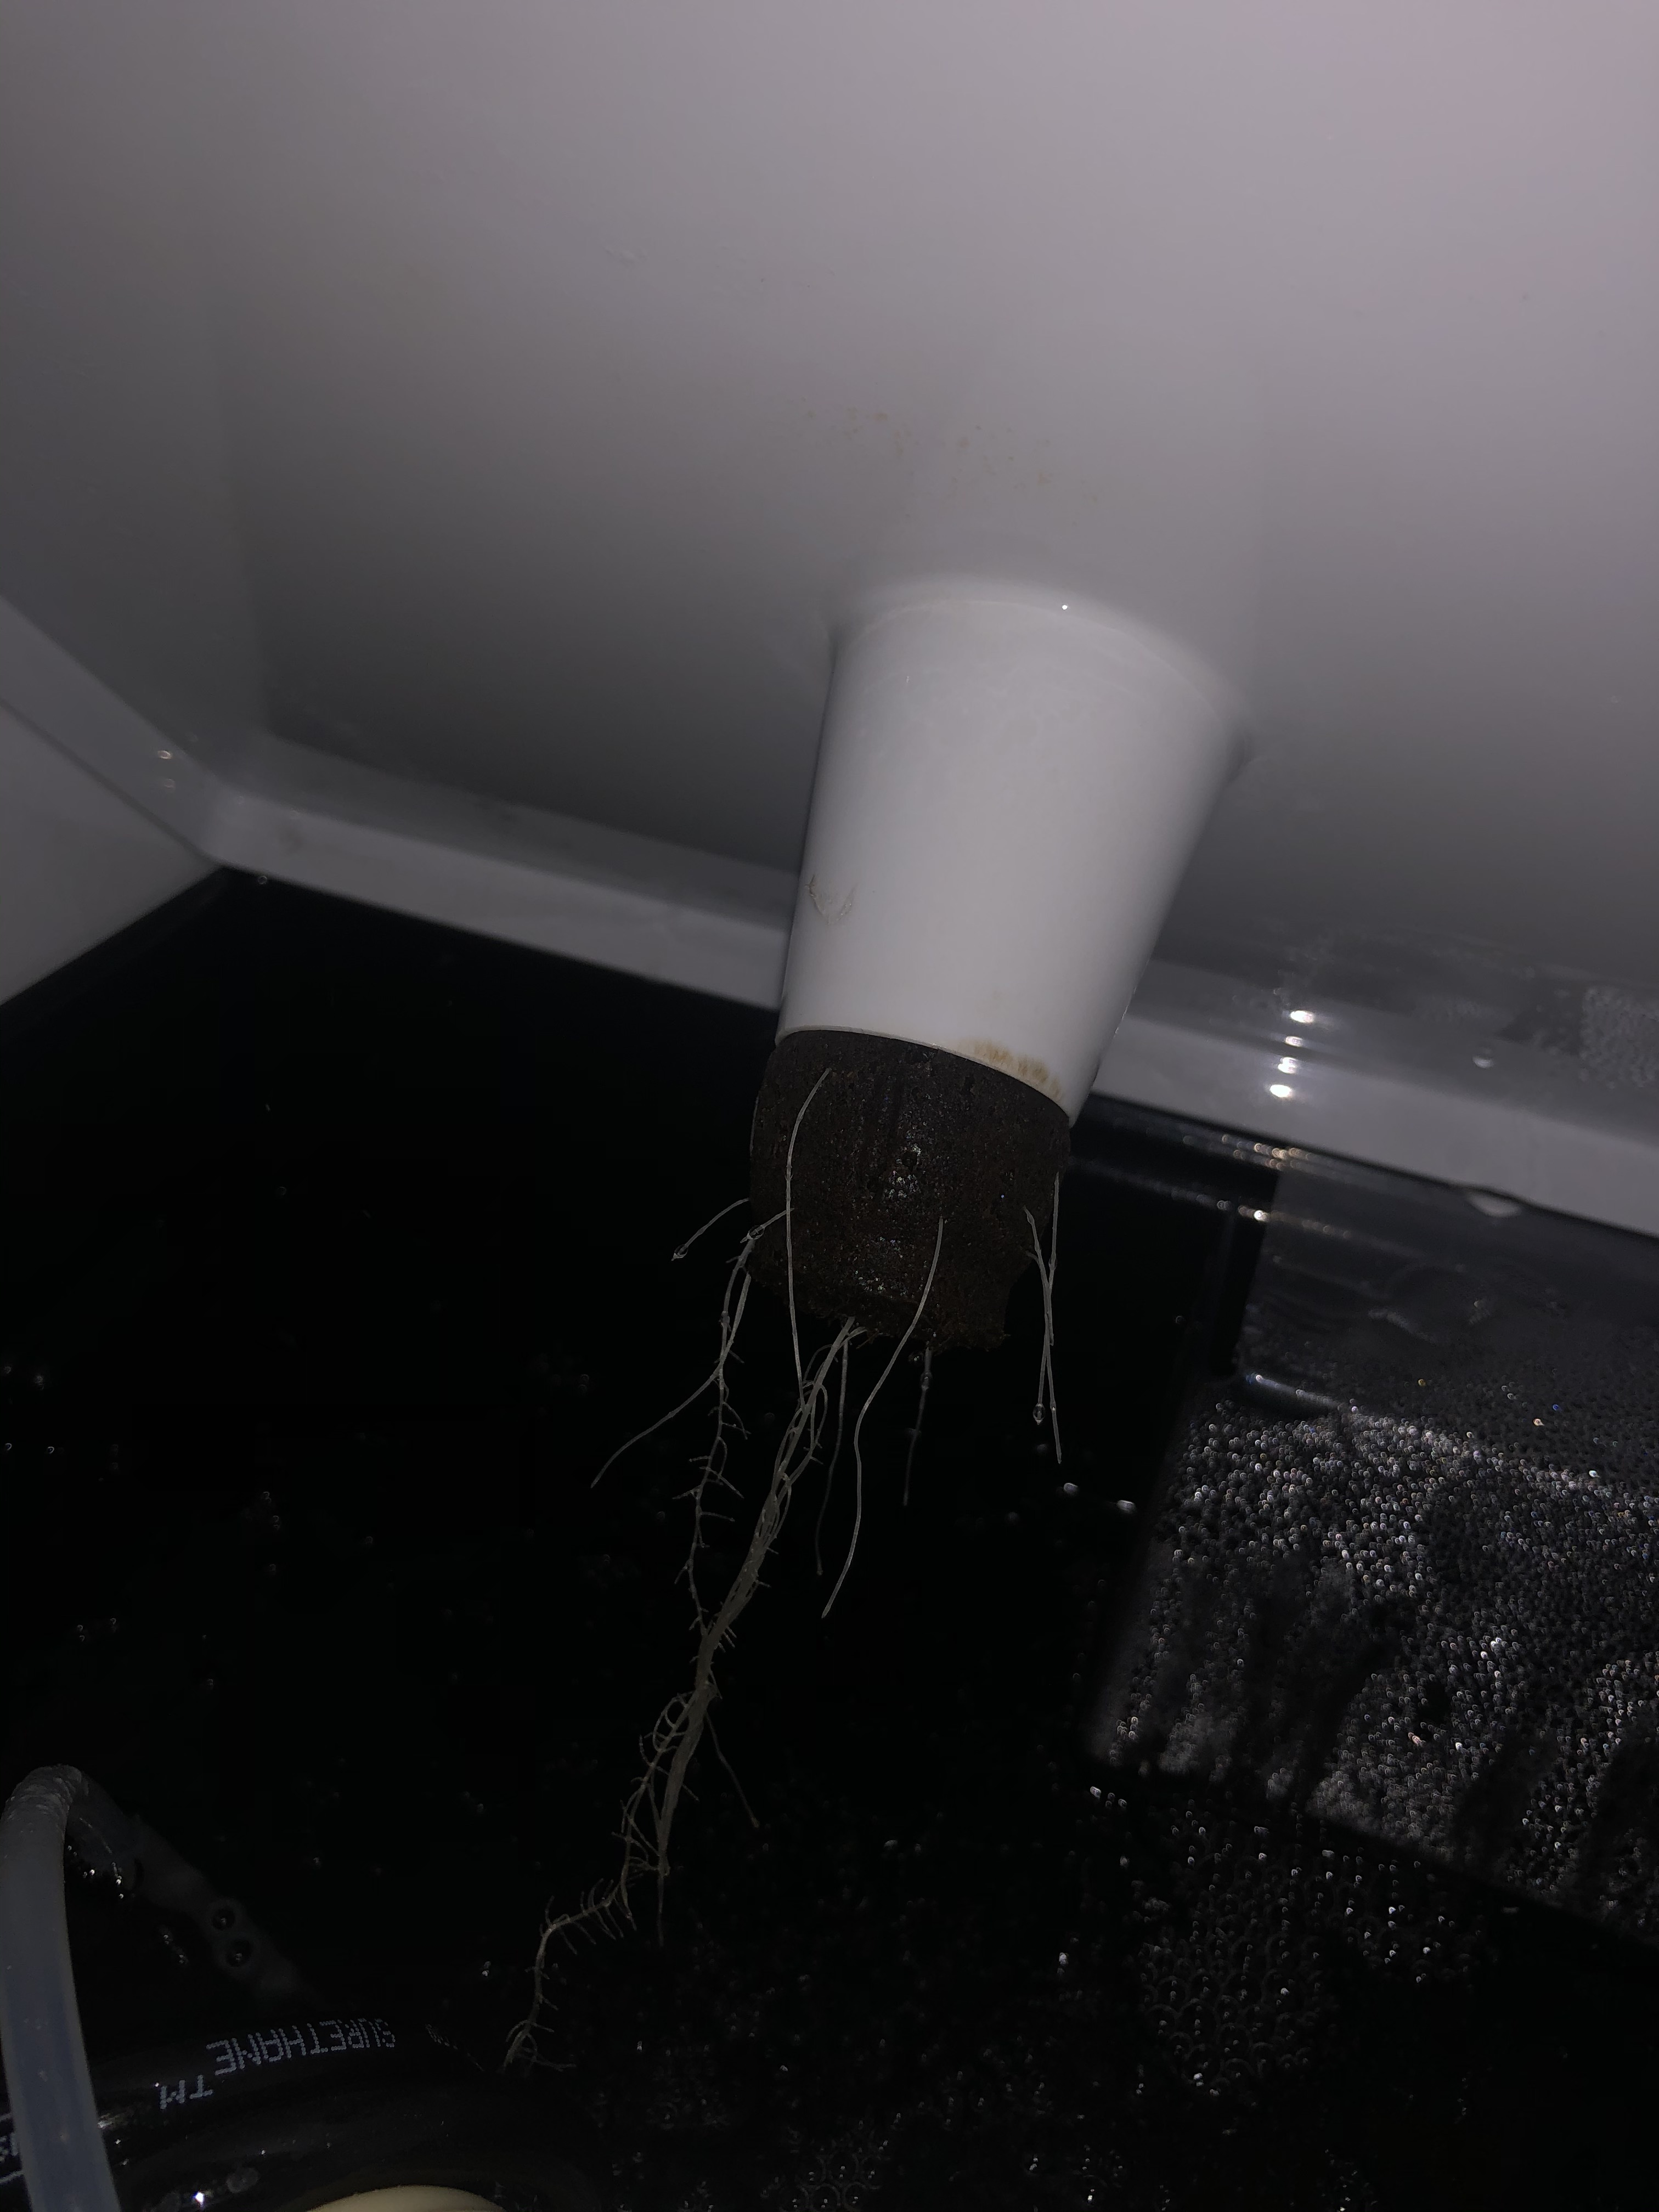
Updates: For the most part she seems to be responding very well. I installed the water chiller and everything is running smooth. I really consider building my owner chiller, (thanks for the video’s) however, I do not believe I would have been able to build anything remotely similar to the videos. The water temperature is remaining at 19-20C. I checked PH for the first time and it read at 5.8. I will continue to check this reading during drain and fills. I noticed bottles 1&2 have dispense almost half trying to regulate the water. I may have put a half gallon of regular water in during last weeks drain and fill, however I will monitor now that I can monitor the Ph. There was beginning signs of root rot 2 weeks ago, which I now believe may be resolved. Thank you @Vicc for the recommendation on Hydrogaurd, her roots are looking healthy and the little bit of build up looks gone. Would you recommend continuing with hydrogaurd now that I have a water chiller? I am a little concern about the spotting on the leaves because I can not guess what this is about. The temperatures/ humidity in the unit has been very consistent with the help of the humidifier. The spotting is pretty heavy on the first few leaves that have sprouted and seems more of a problem on the lower leaves. She is already stretching to her 4th node and the main branches are holding strong. I did notice over the last 2 weeks some of my bottom leaves have begun twisting a bit. Any idea why this could be the case?


5 Likes
I believe most TDS meters in USA uses PPM500 while in UK they use the PPM700 scale.
https://generalhydroponics.com/tds-ec-ppm
While in early veg, you should be around 300 - 450 ppm500 range, and the way you can test that is by topping off your water reservoir and then testing the water’s ppm. If its around 600+ then you are using a PPM700 pen (which i have never seen before, but hey I’m some what new at this as well =]).
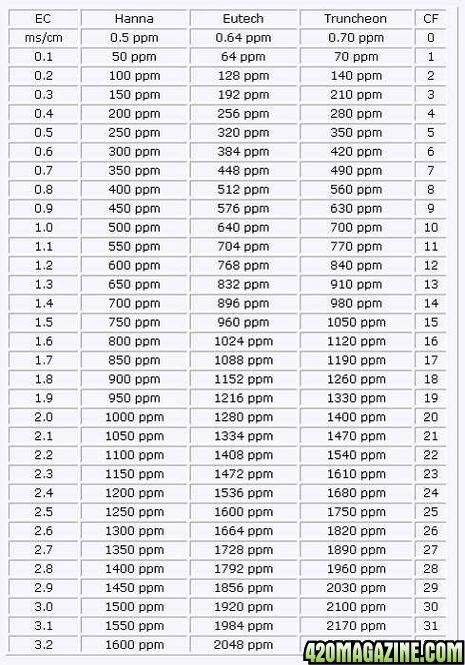
I print this chart out and hang it on my grobo. Its very useful especially if you really want to track your feeding and compare against other feeding guides / charts out there.
Yes, use it at full strength or more until flush, this can also help with nutrient uptake and also keep your reservoir conditions healthy to ward any other bad bacteria.
This is normally ideal range however you would want your ph to swing a bit, normally up to 6 during veg.
This sounds like PH calibration issue, I would clean your probes and recalibrate it again, it could have had buildup from the rootrot and warm waters. I would also toss in a support ticket in just in case.
You can cut off the bottom leaves if they are not getting enough sunlight or touching the lid (you don’t want to give bugs a ramp to climb on your baby). Mines were super ugly before I cut mines off and it was due to the grobo ph balancing all crazy.
To minimize the new spotting, I would top off (do a fill) the reservoir daily with RO water and test the PPM and PH while I’m at it and compare against this chart to gauge how my plant is responding to the current ppm feeding levels.

I also log my ppm / ph levels daily when I do my daily fills. You are more than welcome to copy it and use it for yourself if you like.
Also, if you haven’t done so, and considering you already coughed in the money to invest in a chiller, you should add an extra airstone (or 2) into the reservoir. I just tossed in another one which is very large into my reservoir a few days ago and man shes responding very well to it. More air bubbles = bigger roots = bigger fruits.
6 Likes
Bigger roots givin those bigger fruits! Haha love it.
Great help here mate
3 Likes
I am glad my nerd super powers  are appreciated and happy to help
5 Likes
The discoloration looks like it could have been from minor cal mag deficiency. Possibly from your ph imbalances previously or could be your plant is too small for the current dosage its getting. The lower leave discoloration will be more visible since they do not get as much sunlight and your plant will burn its nutrients before any other new leaves.
You can clean your probe with a toothbrush and baking soda and warm water if you do not have a probe cleaning kit .
You said your ppm 680 before topping to 480, are you in late veg now?
On your next water change, I would add an extra cup of ro water into the reservoir to lighten up your solution
I think once your ph probes are calibrated and your grobo stops going nuts with your #1 and #2 bottles (more than likely can be resolved by cleaning probes and doing a calibration). She should be much happier but she does look good dispite some of that discoloration
If you are now in late veg, I would recommend topping her off daily after doing your refill and adding an extra cup of water. since she is now being introduced to a higher level of nutrients. Your first top off will be light with the extra cup of added water. It will start balancing out after 3 days and become much lighter for your plant.
You can also balance this out by adding more time to your plants growth by extending your late veg schedule by 1 week to keep it on this feeding cycle a bit longer to allow it to get bigger before ramping the nutrient level up with the next grow cycle (transition)
What I noticed about the grobo is that they tend to start on the higher ppm ranges and with daily top offs you will become within range after 2 days of topping off.
Also it wouldn’t be a big deal if you started to cut the ugly leaves at the bottom first. Especially the ones touching the lid. What’s important is exposing light into the new growth area, including the new budsites / stem growing between the leaves.
She will appreciate the extra airstone, mines responded very well when I added 2 extra ones. I am running on 3 airstones and it looks like a jacuzzi bath in my reservoir but she loves it.
Also if you are using a submersible pump for your water chiller, i would put a sock over the pump and tie it down with a zip tie to prevent the roots from getting clogged up on there. This happened to me a few weeks ago when I notice my plants growth stated to slow down. As soon as it was addressed she bounced back super fast, so keep an eye out for that.
I would also add a mini fan to blow at her at low to medium to start training her and dry out her cocopod, it no longer needs to be wet… the wind will help her grow stronger and faster
4 Likes
I will be trimming some of the lower leaves tomorrow. I have been hesitant to do so with her looking the way she does but if it is best, then it is time for a small hair cut. Right now I am on day 2 of late veg. I planned on extending this at least a week as I plan to mainline. I looked at you table and noticed my ppm levels may be low for late veg. Do you have a recommended range for a ppm500 for each stage? (seedling, early & late veg, etc)
I will get to cleaning as soon as the calibration solution comes.
The fans and air stones have been ordered. Help is on the way!
1 Like
dont be hesitant to trim her, they are resilient plants and she’ll bounce back twice as fast. as long as your ph is in range, she’ll be fine and will reward you with bigger budsites so give it a shot!
I always remind myself “Remember, you are growing bud not leaves”
My chart is ppm700 so 1140 = around 825 ppm500 range (I wished i started logging it during early veg so we can have more data to compare with.) , the grobo will up your range in during the last weed of late veg before transition. You should be fine in your current range, diluting the solution a bit wont hurt.
This is a good guide to use and one that I actually use myself: You will want to convert these ppm700 values down to ppm500 with that other chart
You’ll notice that the grobo is about a tad bit higher than the recommended doses, however after daily top offs, the range will be perfect after 2 days. This is how many growers who manually mix their solution do it if they are feeding by how the plants feeling.
PPM Levels for Cannabis Chart
Seedlings Stage: 100-400
Nutrients aren’t really needed during seedling stage.  A little Root Juice is always helpful.

Early Vegetative Stage: 500-800
This includes clones.  Nitrogen is the key nutrient at this stage.

Late Vegetative Stage: 800-1200
Plants require a mice mix of N-P-K.  Mixing a grow/veg solution and a flowering/bloom solution is a good way to get the balanced N-P-K you want at the end of vegetative stage.

Early Flowering Stage: 1000-1400
The cannabis plant will stretch at this point.  The need for Nitrogen begins to decrease while the need for Phosphorus start to increase.

Mid Flowering Stage: 1200-1600
This is the stage when a cannabis plant needs the most food. Maintaining moderate levels of Nitrogen, while boosting Phosphorus & Potassium to boost flower growth.

Late Flowering: 1000 – 500 – 0
Late flowering starts with a decrease in PPM.  During the ripening week, PPM may be around 500. Finally PPM is dropped to zero.  This is the flush. Plants get fed only water to flush their systems of all the chemicals.  This flush improves the taste and decreases the harshness.

Source: PPM Levels for Cannabis Plants - Autoflower Seed Shop
2 Likes
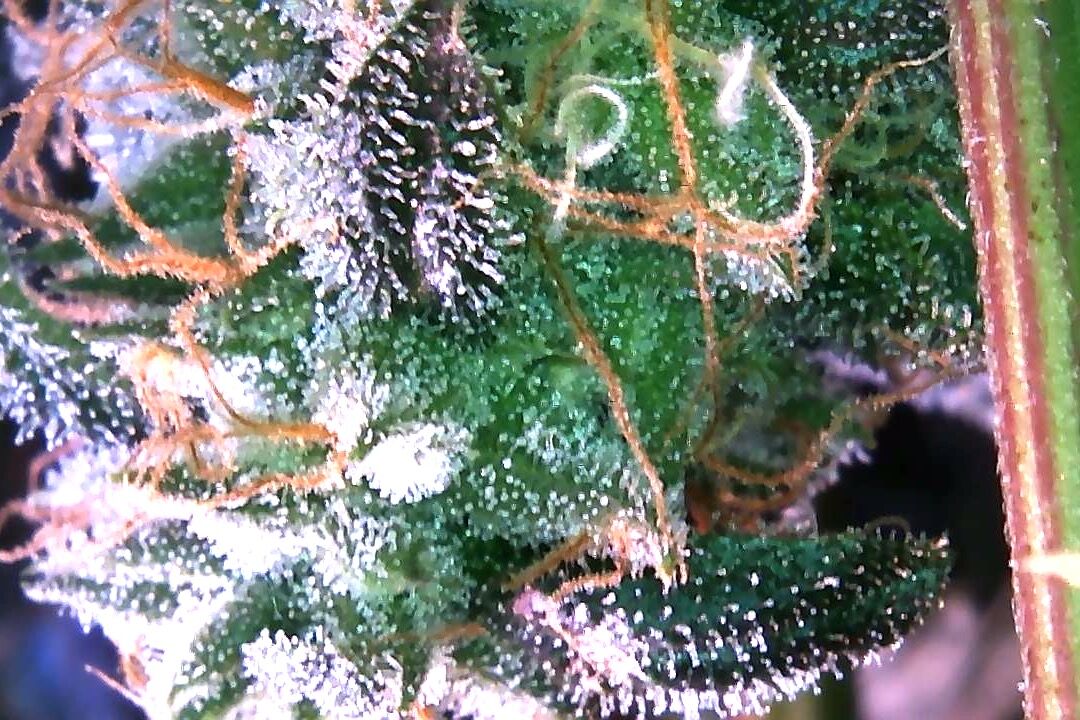
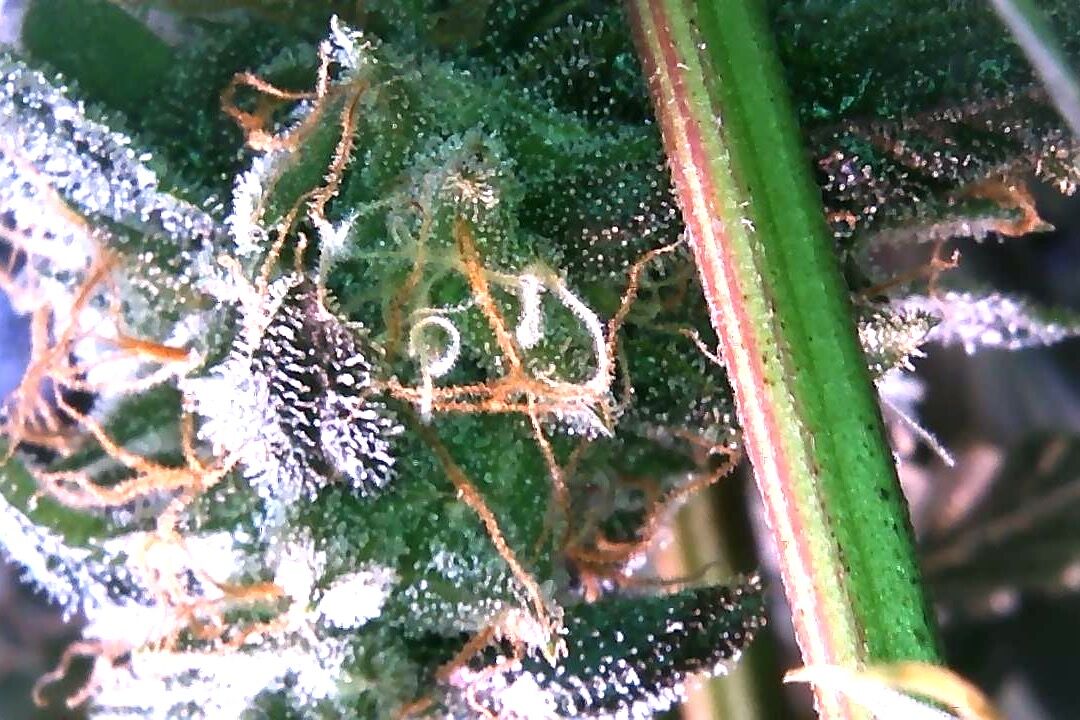
In fear I destroyed the plant during mainlining I was scared to post however now I am unsure when to harvest. I am at 51 days in flower and I believe she is looking well. I have attached some photo’s below . on the current progress. I was planning on switching to flush within the next couple of days. Can someone please help me decide if she is ready?


5 Likes